How To Measure For Curtain Rods
Measuring for curtain rods sizes is simple if you keep the following guidelines in mind.
Some guidelines are fairly straightforward such as:
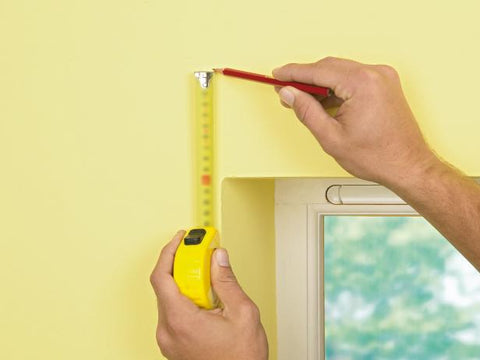
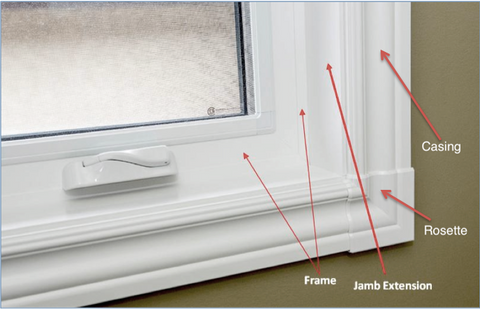
- Measure your window from casing to casing or frame to frame. Don’t mix and match otherwise you will end up with an uneven look. If it is required to mix and match measurements, please give us a call or email us so we can walk through it together and figure out the best solution!
- Use a metal tape measure. Other types such as cloth can give erroneous measures
- Record all measurements to the nearest 1/16th of an inch
- Always double, triple check your measurements! You don't want to end up in the same position as this little fella...

Other things to keep in mind are a bit subjective and here are general guidelines for you to work with:
WIDTH. When measuring for window widths, you are trying to derive the right curtain rod length while considering how much you would like your curtains to carry on past the window opening.
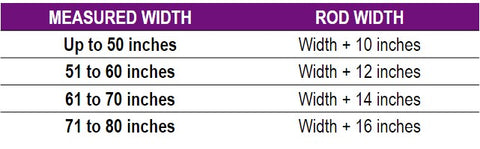
For determining appropriate rod length, general industry rule of thumb is to add ~20% to the measured frame or casing width. Here is a table to keep handy for determining rod lengths quickly:
The factor to consider when measuring the width is space needed for the stack. When your curtains are opened, they will gather on either end – this is what is referred to as the “stack or stack back”. This is important, especially when dealing with small windows as you will want to expose as much of the window glass as possible to give an illusion of a larger window.
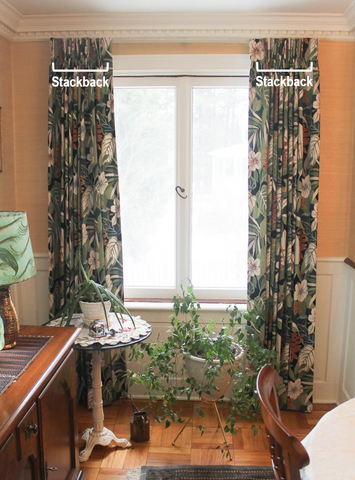
As an example, if your window is 48 inches (4 feet) wide and your curtains split in the middle. If the stack width of your chosen curtains is 10 inches on either side, it would result in 10 inches of window glass on either side being covered by the gathered drapery. In other words, a full 20 inches (or ~40%) of the 48 inches of window glass will be covered by the stack. Not ideal!
Ideally, you will want to have the stack pushed all the way over so that very little, if any, of the window glass is covered. To accomplish that, you would need to make sure the curtain rod is at least 20 inches larger than the original window size of 48 inches, or 68 inches. This would result in all 48 inches of window glass showing when curtains are fully opened. Most ideal!
It is not necessary for your drapery to always clear the window glass; however, we recommend allowing at least 3 inches minimum on each side to allow the curtains to open completely! Let the sunlight through!
For most drapery, you should allow approximately one-third of the width of the window for the stack-back. If the drapery fabric is unusually bulky, you may need to add an extra inch or two. Heavier fabrics and wider windows require more of a stack-back than lighter-weight fabrics on narrow windows.
A good rule of thumb is to have the curtain rod extend three to four inches from each side of the window frame. Using a pencil, make a small mark at the appropriate width on the wall. You may want to use a level to make sure the marks are straight.
HEIGHT. Determining the appropriate height to hang your curtain rod is crucial to achieving a successful drapery installation.
Measure the height of your window treatments from the desired point (floor, window sill, etc.)
Measure on each side of your window to ensure that the window hardware is straight. Use a pencil to make a small mark on the wall on each side of the window, at the correct height.
You will want to hang the drapery high enough so it covers the top of the window by at least a few inches if possible. If you are using tab / tie top drapery panels or clip rings which will lower your drapery making it sit well below the rod, you will need to move the rod up a few inches as an allowance for the difference, thus ensuring the top of your window will not be visible through the ‘gap’ created by the tab / tie top panels or the clip rings.
Draperies can also help create the illusion of a taller / higher ceiling. You can achieve that by mounting your rod 8 to 10 inches above your window; or for a more dramatic effect, 2 – 3 inches below your ceiling line or just below your crown molding or trim.
We recommend a minimum of 4 inches above. By doing so, the drapery will draw the eye up, creating a visually vertical line that gives the illusion of a higher ceiling. This creates a palatial look, and is also helpful when you want to emphasize existing high ceilings or want to draw attention to intricate architectural details in a room.
If you are using ready-made draperies, check to see what lengths are available, and decide on the rod height according to the appropriate panel length for your ceiling height. Most ready-made drapery panels are available in a variety of lengths, ranging from 84 inches, 96 inches, 108 inches and 120 inches. This offers flexibility without requiring custom drapery panels.
CWF PRO TIPS: Things get complex when determining how high to install curtain rods.
From our professional experience over the years, we have ascertained that most customers tend to initially want their rods hung too low. Once we explain the design and conceptual advantages of installing curtain rods higher, most tend to agree and end up much happier and satisfied with the overall look after the completed installation.
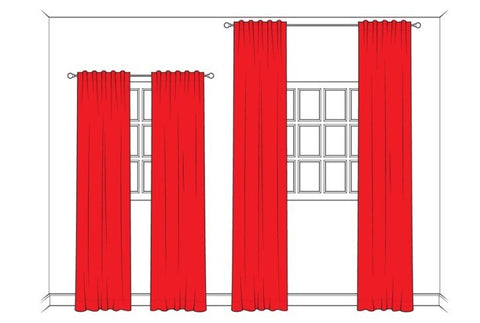
A drapery rod becomes a focal point once it is installed, and if it is installed too low it will create an optical illusion of a lower ceiling thus bringing down the height of the room. The picture above sums that up pretty well. A drapery rod installed higher makes the windows and room look taller, grander. The eye is tricked, creating the visual illusion of height.
You can continue reading onto how to measure for and select curtain rod sizes and brackets or browse our extensive curated selection of curtain rods to dress your windows like you've always wanted.